
Content Creation Features
NEW: A vision for education and skills at Newcastle University: Education for Life 2030+
Sections
By default, all the questions you create in a question set are in one section. If you wish to use one section only you do not need to make any adjustments. However, you can choose to split a question set into separate sections. This could be used for grouping purposes – for example if there are separate parts to the exam, or sections can allow the use of additional functionality when creating your exam content.
A section is defined as a group of questions within a question set.
Common use cases for sections include breaking up the test into smaller chunks. For example, by topic or question type, or for creating 'random blocks' where students are presented with a random selection of questions from a larger question pool.
General options for sections
To add a new section, you need to select the ‘Add section’ button that appears at the bottom of your list of existing questions. From here, you will be prompted to give your section a name, and then you can click ‘Add’.
Section Settings
You can access the settings for each ‘section’ in your question set by selecting the vertical three dots icon next to the section name. From here you can move the location of your section within the question set, rename it and also remove it.
Section Layout and Stimulus Options
Section Layout can be used to alter how the question set is displayed to students. The default layout is one question per page. Section stimulus can be added, this is a one-page/text area that will appear to the left hand of each question within the section.
To change the section layout, click on the icon next to the three dots which is a grid with a settings cog.
The layout options include:
- Basic layout: One page per question (the default)
- Vertical layout: All questions on one page*
Stimulus options:
- Basic layout: With left stimulus
- Vertical layout: With left stimulus
- Vertical layout: With top stimulus*
*It is recommended to use this format if all questions are short in length, long questions (text exceeding 3-5 lines) with such a layout use could interfere with the question view.
As standard, it’s strongly advised to leave the ‘allow candidate to resize stimulus’ option ticked ‘on’, as this will assist students with viewing the stimulus:

Using Stimulus within Sections
What is a stimulus within Inspera Question Sets?
As mentioned within the Sections expandable, you are able to apply Stimulus to questions. You could use ‘stimulus’ to provide a piece of content (both images and text) to be used alongside a group of questions. It is possible to upload pieces of text as a stimulus (e.g. you could copy paragraphs from a PDF) and include imagery or tables.
Stimulus best practice
Stimulus can be helpful when authoring exam content, as information that is relevant to question(s) within a section can be displayed alongside the question itself.
Stimulus examples include:
- case studies
- background information
- key concepts that students should refer to.
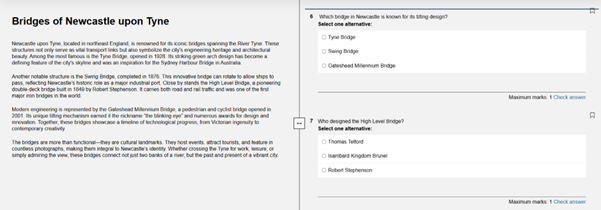
You could include a stimulus along with one exam question where the student needs to repeatedly refer back to the stimulus content whilst completing their answer to the question. This can allow for a better student experience by enabling both the stimulus content and questions to be side by side on the screen.
You could also utilise a stimulus when you have a piece of content and have multiple questions for students to answer using this content. This would again allow for a better student experience for allowing them to see all questions associated with the stimulus together by utilising the ‘vertical layout’ with stimulus for the ‘section layout’.
Example of a stimulus (left) with associated questions (right):
Section Layout and Stimulus Options
To enable stimulus on your question set, click on the icon next to the three dots which is a grid with a settings cog. From here, there are three layout options for stimulus:
- Basic layout: With left stimulus
- Vertical layout: With left stimulus
- Vertical layout: With top stimulus
You can then select the type of stimulus you want to create from the following options: document, text area, form or math working.
Once you click save, you will then be prompted to add your actual stimulus content.
Using highlighting within stimulus
To further capture student attention to a particular part of a stimulus, you can highlight text in a section Stimulus. The highlighted text becomes visible to students as outlined per individual questions in the section.
If a Stimulus is used for multiple questions, as students moves through the questions; you could highlight different parts of the Stimulus text in line with what is relevant for the selected question.
How to apply highlighting within stimulus
- While editing the Stimulus, select the text that you want highlighted and click on the highlight brush (at the top right of the toolbar).
- Select the question this highlight refers to:
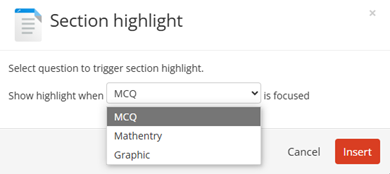
- In this example, the MCQ question is selected.
- Click 'Insert'.
- Repeat for all questions as required.
- Review all highlights using ‘Section highlights’.
- Click Save.
Important note: for highlighting to be achieved, the 'Document' option must be used as the Stimulus.
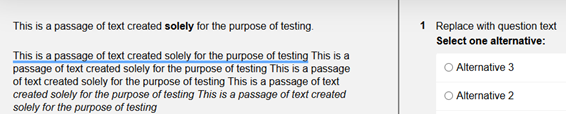
Student view of stimulus highlighting:
For example, Q1 displays:
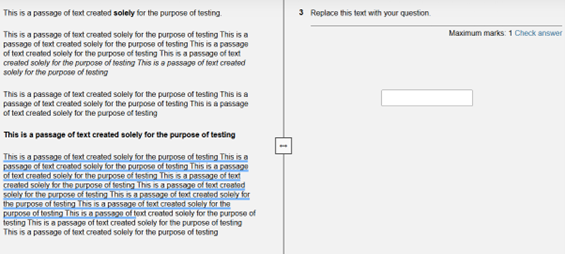
For example, Q3 displays:
Randomisation
Within a question set, your questions can be presented all to students in a random order. This feature can be turned on per section. To access randomisation options, click on the 'question delivery’ option within your section header. The ‘question delivery’ option has an icon of two arrows pointing in the same direction overlapping each other.
To randomise the order of the questions, select the ‘randomise order of questions’ option using the left-hand radio button, and then click ‘save’.
Once applied, the section will have a blue banner showing the feature has been applied.
Important note: if you have an instructional document within your section, this will also be part of the random order. Therefore it is recommended that a separate section is created for any instruction which you have before the section with randomisation applied.
Random Pulling
The questions within the question set can be randomly pulled, meaning students will answer a given number of randomly selected questions from within a section. This feature can be turned on per section. To access random pulling options, click on the 'question delivery’ option within your section header. The ‘question delivery’ option has an icon of two arrows pointing in the same direction overlapping each other.
To randomly pull X number of questions from the section, select the ‘Pull X of Y questions from this section’ option using the left-hand radio button. Enter the number of questions you would like the system to pull, and then click ‘save’.
Once applied the section will have a blue banner showing the feature has been applied.
Important note: This option is only available if the marks for each question in the section have the same maximum marks. If questions within the section have differing total marks, the feature cannot be enabled.
Implications of using random pulling
The Digital Exams Team recommend ensuring that any random pulling questions are housed within their own section and this feature is used with MCQs only. This is due to restrictions when editing questions after an Inspera exam has taken place. If a question has been used and includes ambiguity and you wish to remove the question’s weighting from the exam, random pulling could impact the final score for students. Please see the scenario below for a further explanation.
Scenario
In this example, the Question Set has x10 questions which are multiple response. I have opted to use random pulling so students answer x8 questions. When marking, I discover a question is ambiguous and I need to remove this from the exam. If I remove the question from the exam and I have used random pulling, I cannot guarantee that every student answered that question. Which could mean my cohort have differing totals. Student X who answered questions 1-8 as per random assignment will have 8 questions making up their total. Student Y who answered questions 2-10 as per random assignment will have 7 questions making up their total (as question 10 has had to be ‘removed’).
MCQs can still be edited when using the Random Pulling feature. MCQs have an option for an answer key edit, which allows a new answer to be inputted after the exam and then marked as correct. This is the only question type with this functionality available.
To see the different edits which can be made after an exam has ran please see our marking video covering this. Please be aware random pulling is not depicted in this video.
Candidate Selected Questions (CSQs)
The questions within the question set can be selected by the student, meaning students get a choice of which question(s) to answer. This feature is turned on per each section. To access candidate selected questions click on the 'question delivery’ option within your section header. The ‘question delivery’ option has an icon of two arrows pointing in the same direction overlapping each other.
To enable candidate selected questions, select the ‘Allow candidates to select X of Y questions from this section’ option using the left-hand radio button. Enter the number of questions you would like students to answer, and then click ‘save’.
Note: Students will see all question options.
Once applied the section will have a blue banner showing the feature has been applied.
Important note: This option is only available if the marks per each question in the section have the same maximum marks. If questions within the section have differing total marks, the feature cannot be enabled.
Student experience
When using candidate selected questions, students can opt to answer select questions. They are presented with the following options:
- Undecided: The default state. This state can also function as a temporary placeholder while the student decided which question(s) to answer
- Yes: The candidate has chosen to answer the question
- No: The candidate has chosen not to answer the question.
Important note: Students can change their original decision by changing ‘yes’ to ‘no’ and picking other question(s) to answer. If a student wishes to resume work after changing their decision from ‘yes’ to ‘no’ their work isn’t lost; if they change their decision back to ‘yes’ they can continue their work from When this option is used, the Digital Exams Team will add instructions for the students.
The Digital Exams Team recommend ensuring that any Candidate Selected Questions are housed within their own section. The reasoning for this recommendation is due to instructions being required for students to understand how to navigate their questions choice and for ensuring as much flexibility as possible is enabled for editing questions after an Inspera exam has been taken by students.
Allow Listing
What is allow listing?
Within Inspera the standard exam set up is a secure closed-book (or locked down*) exam environment whereby students are only able to access their Inspera Digital exam. They are unable to access internet search engines, their own notes or other applications.
Web pages and PDF documents can be 'allow listed' so that they can be accessed securely within an Inspera Digital Exam. Allow listing of web pages or documents is completed while creating your Question Set.
The resources (when allow listed) are made available for students in locked down Inspera Digital Exams. A network filter ensures students are not able to navigate away from the page specified. All links, except allow listed resources, are blocked.
*Further information about locked down exams (and the tool used to support this) can be found on our Safe Exam Browser webpage.
How do I add an allow listed resource?
To enable access to a web page or PDF, this resource should be added to the question set. To add a resource:
- Go to your question set select ‘Resources’ option. This is shown next to ‘Questions (x)’ in the top left area of the Inspera screen.
- Select ‘add resource’ and pick the option you wish to use, PDF or link (webpage).
- For a PDF you can browse from your machine and attach the file.
- For the URL you can paste the direct link.
- For both, you'll be prompted to give the resource a name, this will be visible to students.
- Click save.
When adding an allowed URL, note you can add a custom root URL, this means students navigate to all pages associated with the website instead of accessing a singular webpage.
When allow listing is used in your centrally supported summative exams, the Digital Exams Team will add instructions for your students.
What is the best practice around using allow listed resources?
The Inspera Digital Exams Team have collated some guidance of best practice of using allow listed resources, particularly around PDFs.
- Inspera advise that a maximum of 10 resources (PDF and URLs combined) can be attached to a single question set.
- You should consider how many pages your PDFs are and whether students will have sufficient time in their exam to engage with the material. Where possible you should reduce the number of resources and pages to information that is required.
- If your PDF is greater than 30 pages, it is advised that you bookmark your PDFs to support your students with using these in their exam. There are instructions on this webpage advising how to do this.
- Please ensure that your allow listed PDF is attached to your question set ahead of the question set deadline. This allows the Team to complete sufficient testing. Please contact Exams@newcastle.ac.uk if you feel you cannot attach the PDF by the deadline to allow us to liaise with you.
- Allow listed URLs should also be attached to your question set at the point that you submit this to the Digital Exams Team.
How do I bookmark a PDF?
It is possible to set up bookmarks on a PDF which can then be viewed within a locked down Inspera Digital Exam, if the PDF has been allow listed.
The setting up of bookmarks on Adobe should be done in the usual way, for support with Adobe see external link: Page thumbnails and bookmarks in PDFs, Adobe Acrobat section ‘create a bookmark’.
The Digital Exams team will be able to add instructions into the Inspera Exam which advise students how to access bookmarks. We will need to be advised that bookmarks are used within your PDF, this should be done at the time of sharing your Question set URL with digital.exams@ncl.ac.uk. If we are not informed of this, the standard instructions to students about accessing allow listed information will be provided but the additional bookmark information would not be shared.
Composite Question Type
The composite question is a question type in Inspera that enables you to combine different question types into one question.
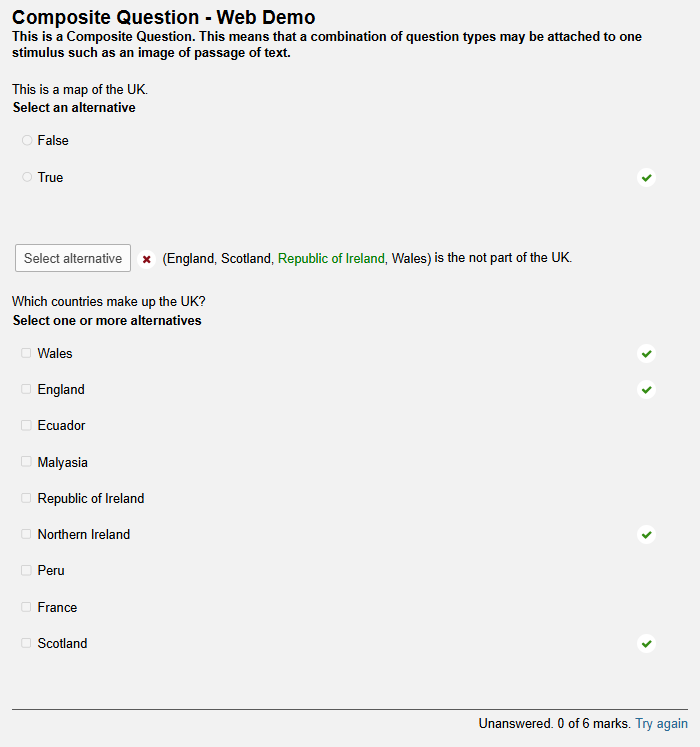
An example has been created for training purposes (displayed in the preview mode):
Why use the composite question type?
Avoid question style fatigue:
When using large banks of MCQs, to avoid question style fatigue, you may wish to consider use of composite questions as this allows for variety. Question type fatigue can occur when students are exposed to the same interaction repeatedly. Composite enables the aim to support sustained engagement whilst still using auto marking.
Enables clear instructions for exam sections:
When using large banks of MCQs, to avoid question style fatigue, you may wish to consider use of composite questions as this allows for variety. Question type fatigue can occur when students are exposed to the same interaction repeatedly. Composite enables the aim to support sustained engagement whilst still using auto marking.
Enables clear instructions for exam sections:
If using a composite question, this can aid student understanding as it:
- ensures related tasks/questions are in one area,
- reflects explicit expectations (i.e. a question could begin with ‘Answer all parts’)
- could reduce cognitive load caused by moving between unrelated questions.
Allows for mark totals:
Marks are awarded per answer, but composite questions display an overall total mark for its whole. In the above example, each correct answer is awarded 1 mark, bringing the total to 3. Important note: Please be aware each question type used within a composite must carry the same mark total.
Creates opportunity to scaffold:
If you are creating a set of questions about a topic, you could begin with multiple choice questions (MCQs) which leads to alternate questions such as calculations.
Avoid repeating required information across multiple questions:
If you want students to answer multiple types of questions where text-based information has been included, without duplicating the text-based information across multiple questions, then a composite question could be used.
Alternately, if you are interested in adding information alongside your question(s), please also see ‘using stimulus within sections’ on this page.
What question types can align and be used in a Composite question?
The composite question can be made up with certain types of auto-marked questions:
- Multiple Choice (MCQ)
- Multiple Response
- True / false
- Text Entry
- Numeric Entry
- Math Entry
- Inline Choice
Important note:
If using negative scoring for any multiple entry composite question, negative marking will have different rules for an MCQ vs a multiple response, please either:
- avoid using negative marking
- create separate questions, i.e. x1 MCQ and x1 multiple response. Then apply negative scoring to each question.
How do I get started with composite questions?
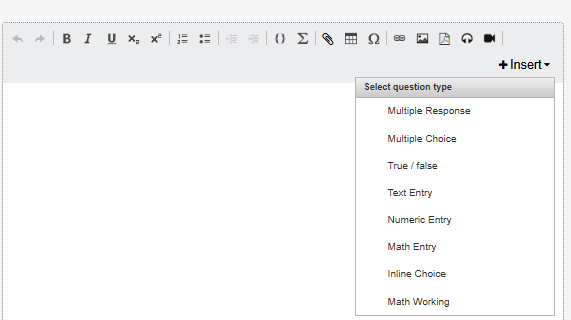
To add a composite question into your question set, you need to choose ‘composite’ when creating a new question within the Author area of Inspera. You will then be prompted to choose the type of questions you wish to add by using the 'Insert’ option of the content editor space.
Inspera has dedicated information about this question type via the Question type - Composite Inspera Help Center webpage.
Digital Drawing Tool
As of 2026, Inspera have developed a new digital drawing tool which has increased functionality beyond the existing drawing tool. In terms of what is new, the new tool allows you to enable the drawing tool at a question level, rather than at a test level. Colleagues can choose what questions they wish to enable the drawing tool on for their students to use in their Inspera digital exam.
The new drawing tool is available for Inspera exams for the 2026-27 academic year. This tool has replaced the legacy drawing tool, which was only available on essay questions.
While the drawing tool is designed to be intuitive and easy to use, we recommend familiarising yourself with it before your assessment. You can test out the drawing tool on the Inspera website.
Choosing between the Drawing Question Type and the Drawing Tool
Depending on whether the drawing is the main element for assessment, you may wish to consider using it as a question type in itself, or if the drawing is to supplement or support the answering of a question, you can opt to add it in addition to an auto or manually marked question. The drawing question type will have marks associated with the question, meaning the grader would manually assign a grade to the drawing provided. The drawing tool can be added but does not have a mark directly associated with it.
Here are some examples of how you may use each tool:
Drawing Tool
- Can be used auto-marked questions to allow students a space to note their workings out or calculations. While these are auto-marked, you could review incorrect answers’ working out in order to award partial marks.
- Can be used with essay questions to allow students to make an ‘essay plan’.
- Can be added to essay or text questions where you wish students to draw something to complement their written work, e.g. if a diagram was needed.
Drawing Question Type
- Provide students with a drawing canvas on which you have embedded a diagram for them to label themselves, in which their ability to decide what they need to label is part of the assessment.
- Provide students with a space to draw their answer to the exam question posed where the drawing will be interpreted by the marker.
How do I add the drawing tool to questions?
To add the drawing tool to existing exam questions:
The drawing tool option is available for all marked question types. It cannot be added to Documents or Form.
- Navigate to the Author tab and select your question set where you would like to enable the digital drawing tool on your question(s).
-
Create a new question or edit an existing question.
-
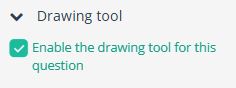
In the right panel, expand and enable Drawing tool option:
- The tool will now be enabled on your question. Preview the question to check what it will look like to your students.
To add the drawing question type to your question set:
- The drawing question type can be found in the 'manually marked' category of the 'create new question page'.
- You can select to add this question type to your question set like you would with other question types.
- You can decide whether you would like to add any images to the drawing Canvas.
How do students use the drawing tool?
Students will be able to launch the drawing tool from any question where the Module Team have enabled the feature or where it has been added as a question in its own right. When the drawing tool is enabled students will see this as part of the question:
- When viewing the question, students will select the option to Start Drawing.
- The drawing canvas will open in an overlay, enlarging the drawing area.
- With the drawing canvas open, students will see the option to Show Question. Selecting this expands the question text, showing both the question and the drawing canvas simultaneously.
- To return to the canvas view, students can select Hide question. This collapses the question text, returning the overlay to its original state.
- Students will select Save & Close to save their drawing and return to their exam questions.
- Once a drawing is saved, options appear on the question page to manage the drawing. This includes: show drawing, edit drawing and delete:

Students will be able to test the digital drawing tool in the demo Inspera exams available on the Inspera Academic Skills Kit webpage where it is enabled in actual demo exam questions. They can also test out the the tool on its own via Inspera's digital drawing tool drawing demo.
If you are using the drawing tool in your exam, we would recommend that you ensure your students have the change to use the tool before the main exam.
Functionality of the drawing tool
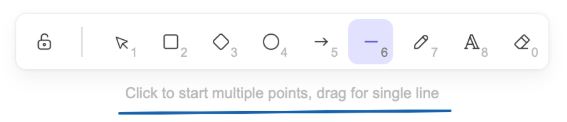
Students can draw using the different tools, colours, and shapes and interact with the elements such that each element can be moved, modified, and deleted.
The tool bar available to students includes various options. It is useful to familiarise yourself with this and see what is available and how this may help you give guidance in your question.
How do I grade questions with the drawing tool?
If the question had the drawing tool enabled when the question was authored, you might see a drawing forming part of the student's response. Drawings could be included on all marked question types, depending if it was enabled.
If drawings are enabled on a question, a 'Drawing' tab will be visible in the grading area.

The drawing interaction can also be seen in the student's response with a quick link to that takes you to the draw tab.
Considerations when using the new drawing tool
When adding the drawing tool to an existing question, the drawing is a supplement to the actual question answer. A question containing a drawing only will not be registered as answered but the drawing will still be available for Graders.
Pre-Defined Feedback
Feedback for questions and answer alternatives can be created when authoring a question within a question set. This feature can be used in summative Inspera exams if you are releasing feedback to students via their Candidate Report and can also be used with formative exams.
Pre-defined feedback is:
- available per question for all question types
- available per answer alternative for select question types (Multiple choice, multiple response, inline choice and true/false)
The Digital Exams Team recommended that pre-defined feedback is to be used with auto-marked questions only. Manually marked question submissions should be reviewed by a Grader prior to feedback release.
Important note: predefined feedback cannot be changed after the test is activated.
How to set up pre-defined feedback per question
To leave pre-defined feedback per question when authoring a question:
- On the question select the feedback drop down on the right-hand side
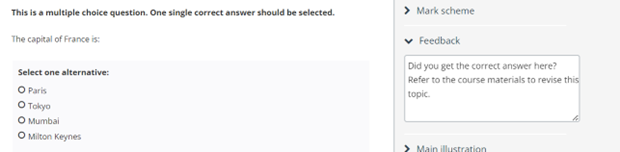
- Enter your feedback text
- Click save.
How to set up pre-defined feedback per answer alternatives
To leave pre-defined feedback per answer alternatives when authoring your question(s):
- Click on the alternatives area when editing your question
- Locate the alternatives area that will on the right-hand side appear
- Click ‘Add feedback’ under the different ‘alternative answers’
- Click save
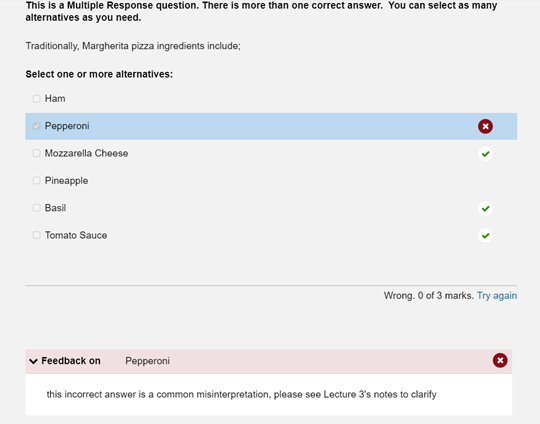
- You can also preview how this will view for a student by using the eye icon (hand-hand side panel). For example, if selecting an alternative answer within the preview, you can also view the feedback available.
In the below example, the feedback given is shared when an incorrect answer ‘pepperoni; is selected:
How to set up pre-defined feedback release
To use this feature, the candidate report must be enabled. For further details on Inspera feedback release and how to enable the candidate report, please see our feedback release webpage.
- Within the Inspera Deliver Tab (Exam settings), go to Options and navigate to After test
- Under the header ‘Post-submission review’ select the option ‘allow student post-submission review’
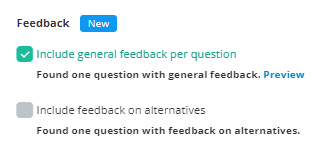
- Locate the header ‘Feedback’. Note: these particular options only become available if the question set contains pre-defined feedback. Select the appropriate options, which include:
- Include general feedback per question - select this if you have opted to use feedback per question
- Include feedback on alternatives - select this if you have opted to use feedback on answer alternatives
- If using both methods of pre-defined feedback, select both.
- If you are sharing feedback on alternatives a further option will appear as 'show feedback for all alternatives'
- Note: If ‘Show feedback for all alternatives’ is ticked, students will see feedback created for all the answer alternatives. Leave this unticked to just show the feedback for the individual alternative(s) the student chose.
- For Formative exams using auto-marked questions, there is an additional step: To share feedback immediately after submission for practice exams, tick ‘Instant post delivery‘ (this can be found under ‘post submission review’).
Multiple Attempts
You can now use multiple attempts on auto-marked questions in Inspera. Although you can use multiple attempts for summative or formative exams, as the lockdown browser ‘Safe Exam Browser (SEB)’ is not available with multiple attempts, this feature is more regularly used with formative exams. You can find details of how to set up formative exams, such as multiple attempts, on our Getting Started with Inspera webpage.
Head over to our dedicated Multiple Attempts webpage for more information about using this feature. Further information on the multiple attempts feature can be found on the Inspera website.
Using imagery within questions
What question types can have imagery added?
You can add imagery to any of your questions within Inspera. Whilst this could be for decoration or engagement, you may actually include imagery (such as an image, graph or diagram) to be referred to when answering a question.
How do I add images to questions?
You can add imagery to questions by using the ‘Add image’ button in the rich text editor toolbar. You will be prompted to name the image and provide alternative (alt) text.

What file format should be used?
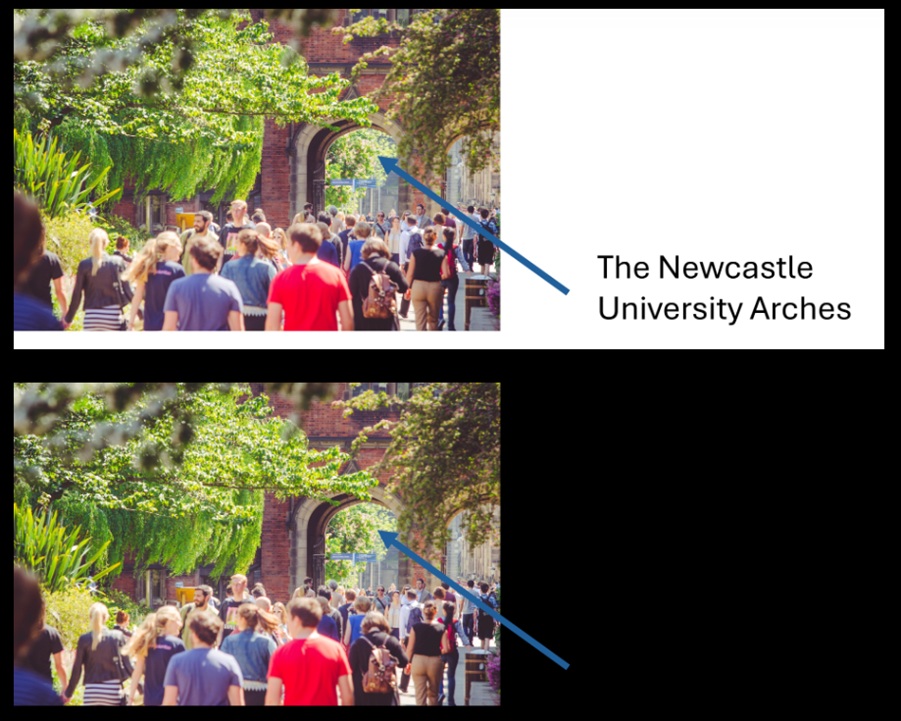
For accessibility reasons, it’s important that any images you upload can be viewed during the exam when any inversion is applied to a test. To ensure that your images are accessible, you should ensure that you upload images in a JPG format only. Whilst in some cases, PNG images may be visible when inverted, we do often see some issues with PNG files.
Use of functionality known as inversion allows the system to show light coloured text on a dark background, instead of the standard view (of dark text on a light background). Find out more about how to check this in the next section.
What does poor image inversion look like?
We’ve created an example to let you see what can happen to images when a PNG image is used. In the example, a JPG image is shown at the top, and a PNG image is shown at the bottom.
How to check your images in inversion mode?
If you are using images, graphs or tables, you should complete an ‘inversion check’ to ensure that graphics are still visible to students utilising the screen inversion feature within Inspera. You can do this whilst previewing your question set.
- Access your question set and select the eye icon in the top right corner (if you hover over this it will say 'preview').
- In the top right corner of the screen, select the three horizonal lines (sometimes referred to as the 'hamburger menu').
- Then select 'Contrast' followed by 'Inverted'.
- You can then close the menu and review the questions in your question set.
Using imagery as a background in drag and drop questions
You can use imagery in the Drag and Drop question type – for example, you may have a map and ask students to drag and drop labels to specific locations, landmarks, etc.
Inspera recommend using image size dimensions of 620x300px.
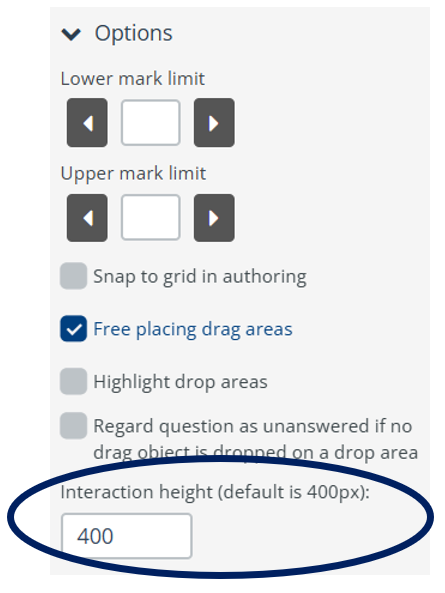
‘Free placing drag areas’ is a default setting where the candidates must drag and drop the object within the corresponding drop area. If this is not selected, the object will automatically move to the correct location.
You may need to amend the ‘Interaction height’ of your background image in order to ensure your full image can be viewed. The default is 400px (recommended height). If the height needs to be increased to facilitate more elements, it is recommended that you preview and test the question to ensure positive candidate experience.
Another question type that may also require a change in interaction type includes hotspot.