
Modules
NEW: A vision for education and skills at Newcastle University: Education for Life 2030+
Modules
Canvas Modules are a powerful tool for organising course content in a structured and sequential manner, allowing instructors to group related materials, assignments, quizzes, and other resources into cohesive units.
Think of modules as chapters in a book or folders that organise related teaching materials, helping you structure your course for a clear learning path.
You can design a course flow using modules to effectively guide students through your resources and ensure a structured learning experience. Modules can be assigned to specific students or groups, enabling differentiated instruction, individual assignments, and conditional release based on prerequisites.
Designing your Learning Path - Example
In this section we will look at an example course module flow from the Newcastle University Canvas template, also known as the Canvas Default Blueprint. This template is designed to help you and your students navigate your courses with ease and efficiency.
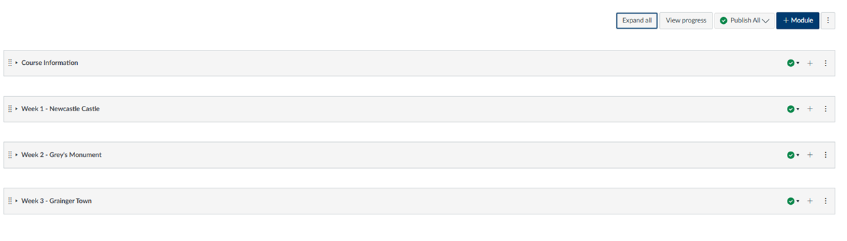
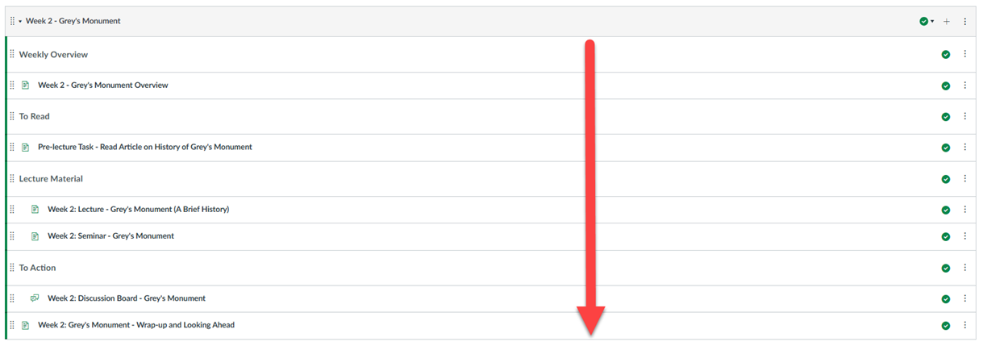
In this course template, we’ve created a top-to-bottom flow to guide you through the learning materials step-by-step. Students begin at the top of the module and progress through the materials one after another, ensuring a smooth and organised learning experience. This flow helps maintain a clear structure, making it easier for students to follow along and stay on track with their studies.
Guidance: Organising Content by Week or Topic
In our example, the content is divided by week, starting with week 1, then moving to week 2, and finally week 3. However, modules can also be organised by topic. Organising by week or topic enables students to concentrate on specific areas of study, making it easier to comprehend and retain information.
Guidance: Sequential Arrangement of Learning Materials
Learning materials within a module are arranged sequentially, following the order in which they should be completed. This structured approach ensures that students can progress through the content in a logical manner, building on their knowledge step by step.
Canvas Modules Index Page Guide
This video provides an overview of the Canvas Modules Index Page demonstrating how to organise course content effectively.
The Canvas Modules Index Page is the main course page where all modules and their learning materials are organised and displayed in a structured, sequential list.
You will learn how to structure modules, set requirements, and monitor student progress to enhance your teaching experience.
Step by step instructions highlighted in this video can be found on the How do I use the Modules Index Page? (Step by Step Guide) page.
For the full guide please visit How do I use the Modules Index Page? Instructure Instructor guide.
Creating/Editing/Deleting Canvas Modules
These guides show you how to manage modules within your Canvas course. You’ll find step-by-step instructions for adding new modules, editing or deleting existing ones, duplicating modules to create copies quickly, and moving or reordering modules to adjust their position.
Each guide is accompanied by a short video, giving you a quick visual walkthrough of the process.
How do I add a module?
In this short video, you will see how you can add a new module to your course.
Step by step instructions highlighted in this video can be found on the How do I add a module? (Step by Step Guide) page.
For the full guide please visit How do I add a module? Instructure Instructor guide.
How do I edit or delete a module?
In this short video, you will learn how to edit or delete a module that is already created in Canvas.
Step by step instructions highlighted in this video can be found on the How do I edit or delete a module? (Step by Step Guide) page.
For the full guide please visit How do I edit or delete a module? Instructure Instructor guide.
How do I duplicate a module?
In this short video, you’ll discover how to duplicate an entire module, including all its contents.
Step by step instructions highlighted in this video can be found on the How do I duplicate a module? page.
For the full guide please visit How do I duplicate a module? Instructure Instructor guide.
How do I move or reorder a module?
In this short video you will learn how to move or order the modules in your course:
Step by step instructions highlighted in this video can be found on the How do I move or reorder a module? (Step by Step Guide) page.
For the full guide please visit How do I move or reorder a module? Instructure Instructor guide.
Adding/Editing/Deleting Module Content
These guides show you how to manage individual items within your Canvas modules. You’ll find step-by-step instructions for adding different types of items, including course content, quizzes, text headers, and external URLs.
There are also guides on duplicating module items, removing items you no longer need, and moving or reordering items to adjust their position within a module.
Each guide is accompanied by a short video to give you a quick visual walkthrough of the process.
How do I add course content as module items?
In this short video, you’ll learn how to add course content to a module. This can include creating new content or adding existing content from your course:
Step by step instructions highlighted in this video can be found on the How do I add course content as module items? page.
For the full guide please visit How do I add course content as module items? Instructure Instructor guide.
How do I add a quiz as a module item?
In this short video, you’ll learn how to add a quiz to a module. You can either create a new quiz or add an existing one from your course.
Note: If you add an existing quiz, it will be linked to the module rather than duplicated.
Step by step instructions highlighted in this video can be found on the How do I add a quiz as a module item? (Step by Step Guide) page.
For the full guide please visit How do I add a quiz as a module item? Instructure Instructor guide.
How do I add a text header as a module item?
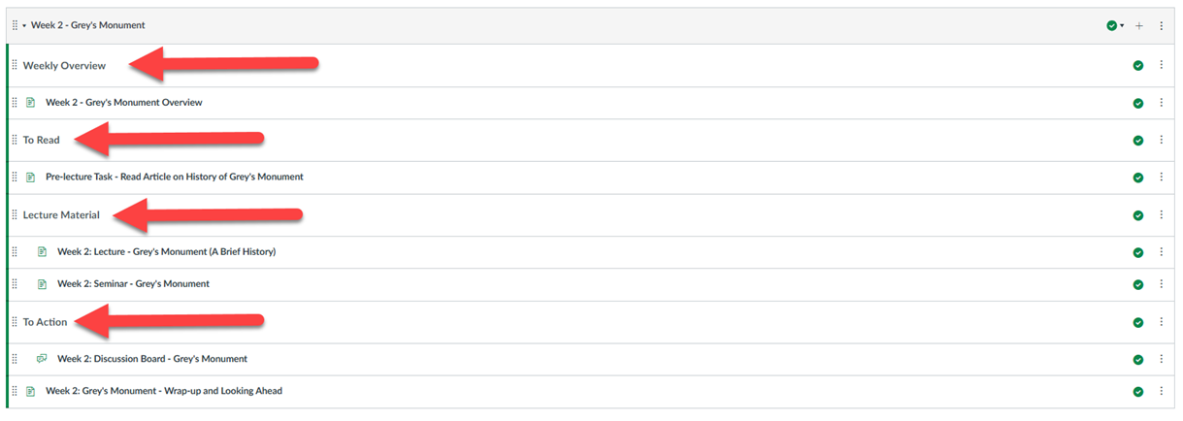
In this short video, you’ll learn how to add a text header to a module. A text header is used to separate and organise content within a module, making it easier to navigate.
Step by step instructions highlighted in this video can be found on the How do I add a text header as a module item? (Step by Step Guide) page.
For the full guide please visit How do I add a text header as a module item? Instructure Instructor guide.
How do I add an external URL as a module item?
In this short video you will learn how to add a URL as a module item:
Step by step instructions highlighted in this video can be found on the How do I add a text header as a module item? (Step by Step Guide) page.
For the full guide please visit How do I add an external URL as a module item? Instructure Instructor guide.
How do I duplicate a module item?
In this short video you will learn how to duplicate an item in the module.
Step by step instructions highlighted in this video can be found on the How do I duplicate a module item? (Step by Step Guide) page.
For the full guide please visit How do I duplicate a module item? Instructure Instructor guide.
How do I remove module items?
In this short video, you will learn how to remove items from a module.
Step by step instructions highlighted in this video can be found on the How do I remove module items? (Step by Step Guide) page.
For the full guide please visit How do I remove module items? Instructure Instructor guide.
How do I edit module items?
In this short video you will learn how to edit module items in your modules:
Step by step instructions highlighted in this video can be found on the How do I edit module items? (Step by Step Guide) page.
For the full guide please visit How do I edit module items? Instructure Instructor guide.
How do I move or reorder a module item?
In this short video, you will learn how to move or reorder a module item, within and to another module:
Step by step instructions highlighted in this video can be found on the How do I move or reorder a module item? (Step by Step Guide) page.
For the full guide please visit How do I move or reorder a module item? Instructure Instructor guide.
Control access and visibility of your content
In this section, we will demonstrate how this would work in your courses.
In Canvas, content release can be managed using the "Assign To," "Publishing," and "Lock Until" features:
Assign to: The "Assign To" feature allows instructors to tailor content for specific students, sections, or groups, enabling differentiated instruction and personalized learning paths.
Publishing Content: The "Publishing" feature controls the visibility of content, ensuring that only published materials are accessible to students, allowing instructors to prepare content in advance and release it as needed.
Lock Until: The "Lock Until" feature sets a date and time when content will become available, helping to pace the release of materials and ensuring students cannot access them prematurely. By combining these features, instructors can create a structured and controlled learning environment, guiding students through the course content in a sequential and organized manner.
Assign To
The "Assign to" functionality in Canvas allows instructors to assign specific modules to individual students or sections within a course. This feature is particularly useful for differentiated instruction, where different students or groups may need access to different content or activities.
This functionality ensures that only the selected students or sections can view and interact with the assigned module content. It's a great way to tailor learning experiences to meet the diverse needs of your students.
You can find out more about this functionality and step by step instructions on how to apply this to your Canvas modules within the Instructor Guidance - How do I assign a module to individual sections or students?
Examples of Using Assign To in Your Courses
Below are some examples using our Canvas Exemplar Course to demonstrate some potential ways of applying this functionality in your courses:
Example 1 - Provide Differing Instruction to Students/Groups
To help demonstrate this, we will use our Canvas Exemplar Course, a course on Newcastle Landmarks which demonstrates best practice in Canvas at Newcastle.
In Week 1, this course covers Newcastle Castle, also known as Castle Keep.
We aim to tailor the content for different student groups, possibly for a group project where students study various aspects of Newcastle Castle. Here’s how we can divide the groups:
- Architecture Group: This group will receive detailed articles and diagrams about the castle's construction and architectural style.
- Historical Events Group: This group will study significant events that took place at the castle, such as battles or royal visits.
- Cultural Significance Group: This group will explore the castle's role in local culture and its impact on the community over the centuries.
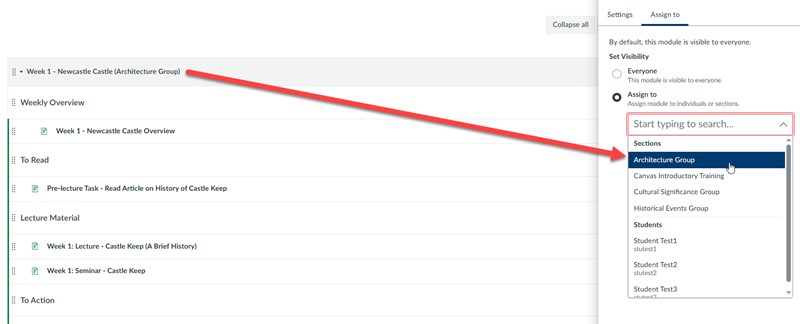
To ensure clarity, we want students to view only the content relevant to their assigned group. For example, the Architecture Group should not access content about Historical Events.
Using the "Assign to" functionality in Canvas, you can assign specific content to each group. By leveraging Canvas Sections, students can be added to the relevant sections based on their interests. This way, the content is visible only to the students in their respective sections.
By assigning these tailored modules, each group engages with content that aligns with their interests, making the learning experience more relevant and engaging.
Below, you can see an example of how this looks in Canvas:
Example 2 - Provide Differing Content to Different Seminar Groups
Within your module, you may have different activities and delivery per seminar which you tailor to different seminar groups.
Each seminar group can have different potential activities depending on how the seminar lead conducts the seminar. This could include specific content that relates to information covered in that seminar, ensuring that the learning experience is tailored and relevant.
You could create three seminar groups: Group A, Group B, and Group C. Using the "Assign to" functionality in Canvas, you can assign specific content to each group.
Group A cover activity 1, while Group B cover activity 2. Meanwhile, Group C could work on activity 3. By assigning these tailored modules, each seminar group engages with content that aligns with their interests, making the learning experience more relevant and engaging.
Example 3 - Providing Additional Resources to Students That Require Further Support
Utilising the "Assign To" feature in Canvas Modules to provide struggling students with tailored resources to help personalise their learning. This method enables educators to offer additional support to students who require it, ensuring they receive targeted materials that address their specific challenges.
By assigning modules to individual students, educators can deliver focused resources such as videos, readings, quizzes, and interactive activities that cater to the students' unique learning needs.
This personalised attention aids students in comprehending difficult concepts more effectively, promotes a sense of privacy and dignity, and prevents them from feeling singled out amongst their peers.
Publishing Content
Publishing content in Canvas Modules on Canvas is how you manage visibility and access to your course materials. When you publish a module, all the content within it, such as assignments, quizzes, files, pages, and discussions, becomes visible to students. However, it's important to note that both the module itself and the individual items within it need to be published for students to see them.
Unpublished modules and items remain hidden, allowing you to prepare and organise content without student access. You can publish or unpublish entire modules along with all their items in one go, or manage the visibility of individual items within a module.
This flexibility ensures that students have a consistent and engaging learning experience, with new materials released at appropriate times when you deem appropriate.
You can find out more about this functionality and step by step instructions on how to publish/unpublish content in to your Canvas modules within the Instructor Guidance How do I publish or unpublish a module as an instructor?
Important Note: Both the module and the items contained within the module must be published in order for them to be visible to students.
Lock Until
The "Lock Until" functionality in Canvas Modules allows instructors to control when students can access specific content within a module. By setting a lock date, the module remains visible to students, including the titles and item names, but the actual content is inaccessible until the specified date and time.
This feature is particularly useful for managing the flow of course material and ensuring students engage with content at the intended pace.
You can create your content ahead of time and schedule its release to align with your teaching plan.
You can find out more about this functionality and step by step instructions how to lock a module visit the How do I lock a module? Canvas guide.
Module Prerequisites and Requirements in Canvas
Prerequisites and requirements help structure the learning path for students by controlling access to course content. Prerequisites ensure students complete certain modules before accessing subsequent ones, and can only be set at the module level.
Requirements define what students must do within a module to complete it, such as viewing a page, submitting an assignment, or scoring a certain grade on a quiz. These settings can be used to track progress, ensure mastery of units, or require completion of items in a specific order.
Important note: When using this functionality—particularly in synchronous teaching—please consider the impact on learners who may miss a session and need to catch up.
Canvas Module Requirements
Canvas Module requirements are essential tasks or actions that students must complete within a module to ensure they engage thoroughly with the course material and meet learning objectives. These tasks can range from viewing specific pages, marking items as done, participating in discussions, submitting assignments, to achieving certain scores on quizzes. By defining these requirements, instructors can monitor student progress and ensure that each student reaches the necessary milestones before advancing.
When all the requirements (actions required of the students) are fulfilled, the module is marked as completed. This completion status can then be utilised by module prerequisites as evidence that the necessary criteria have been met.
These actions can include:
- Viewing an item: Ensuring students look at important content.
- Marking an item as done: Allowing students to acknowledge they’ve completed a task.
- Contributing to a page or discussion: Encouraging active participation.
- Submitting an assignment or quiz: Tracking completion of key assessments.
- Scoring a certain mark: Ensuring students achieve a minimum score on assessments.
Canvas Module Prerequisites
Prerequisites are used to lock a module until a student completes the required items in a previous module. This ensures that students follow a specific sequence in their learning journey. For example, if Module 2 has Module 1 as a prerequisite, students must complete all the requirements in Module 1 before they can access Module 2.
You can find out more about this functionality and step by step instructions on how to apply this to your Canvas modules within the Instructor Guidance - How do I publish or unpublish a module as an instructor?
View Student Progress Through Requirements
In Modules, you can monitor your students’ progress as they move through the course.
Progress is based on completing the requirements you set for each module. If no requirements are added, progress tracking won’t be available. Requirements can include actions such as viewing a page, submitting an assignment, or achieving a minimum score on an assignment or quiz.
Please note: You cannot run a report of this and would need to check each student individually in the list provided.
You can find out more about this functionality and step by step instructions on how to apply this to your Canvas modules within the Instructor Guidance - How do I use modules to view the progress of students in a course?